> For the complete documentation index, see [llms.txt](https://bandans-devops-journey.gitbook.io/devops-project-application-of-linux/llms.txt). Markdown versions of documentation pages are available by appending `.md` to page URLs; this page is available as [Markdown](https://bandans-devops-journey.gitbook.io/devops-project-application-of-linux/managing-resource-utilization-and-server-monitoring-in-aws.md).

# Managing resource utilization and server monitoring in AWS

This project is implemented to enhance the view of active resources in AWS and in addition to that monitoring of instances health check. This will finally trigger an email with all the details.

## **Prerequisites**

1. You should know the concepts and commands of Linux.
2. Basic understanding of Virtual machines, ports, volumes and authentication in cloud.

## **AWS EC2 Instance**

EC2 - Elastic Compute Cloud is a virtual server that runs on the cloud which can be opened by anyone over the internet provided the user have proper authentication to access.

***Let's spin up an AWS EC2 instance.***

1. Login to AWS console and navigate to EC2.

<figure><img src="https://389859271-files.gitbook.io/~/files/v0/b/gitbook-x-prod.appspot.com/o/spaces%2FR9yUYsBi0Y1eeEpTEqSa%2Fuploads%2FXXWSr93hvQDqcDBUm8hk%2Fimage.png?alt=media&amp;token=1daeff20-94de-463b-bc14-5a41069a582e" alt=""><figcaption></figcaption></figure>

2. Click on Launch instance to create a new EC2 instance.

<figure><img src="https://389859271-files.gitbook.io/~/files/v0/b/gitbook-x-prod.appspot.com/o/spaces%2FR9yUYsBi0Y1eeEpTEqSa%2Fuploads%2Fj6ITIP99qrYct99nnHy5%2Fimage.png?alt=media&amp;token=a171bff4-e3a0-405b-be15-c095450c7ed0" alt=""><figcaption></figcaption></figure>

3. Provide the Instance name.

<figure><img src="https://389859271-files.gitbook.io/~/files/v0/b/gitbook-x-prod.appspot.com/o/spaces%2FR9yUYsBi0Y1eeEpTEqSa%2Fuploads%2FtZ8mENOjedYuxBCT7pLq%2Fimage.png?alt=media&amp;token=90893ff1-d348-4e18-b513-8cc9021898fa" alt=""><figcaption></figcaption></figure>

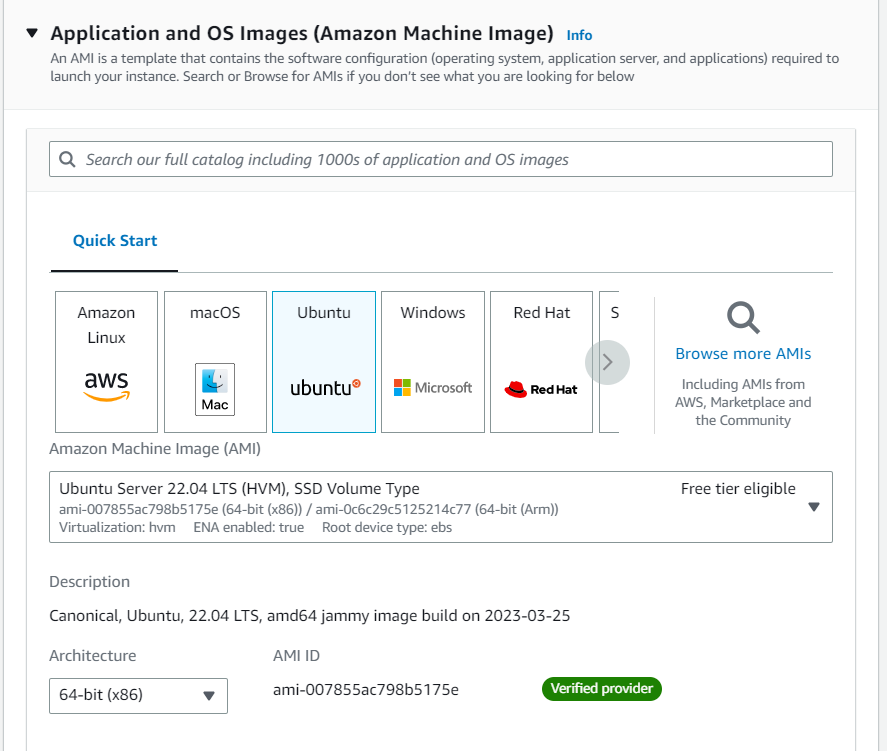
4. Choose the OS image that you need to have in your server. In this project I am going to use Ubuntu.

<figure><img src="https://389859271-files.gitbook.io/~/files/v0/b/gitbook-x-prod.appspot.com/o/spaces%2FR9yUYsBi0Y1eeEpTEqSa%2Fuploads%2F5COr2aVdUl2KMqp60BAi%2Fimage.png?alt=media&amp;token=1e654705-376d-480c-a061-0ea7e7fc0954" alt=""><figcaption></figcaption></figure>

5. Choose the instance shape and size required according to the project specification.

<figure><img src="https://389859271-files.gitbook.io/~/files/v0/b/gitbook-x-prod.appspot.com/o/spaces%2FR9yUYsBi0Y1eeEpTEqSa%2Fuploads%2Fdh45KIoEx7MBDrcbfcAn%2Fimage.png?alt=media&amp;token=ecb2dbae-035b-44f5-93e2-3beaf7f5ab75" alt=""><figcaption></figcaption></figure>

6. Proper authentication to the server is mandatory. Therefore we need to create a private key for the server.

<figure><img src="https://389859271-files.gitbook.io/~/files/v0/b/gitbook-x-prod.appspot.com/o/spaces%2FR9yUYsBi0Y1eeEpTEqSa%2Fuploads%2FhAVhoNGeVV75fCeseda7%2Fimage.png?alt=media&amp;token=5b28d6c9-5c82-4304-b7b5-73273804aff8" alt=""><figcaption></figcaption></figure>

<figure><img src="https://389859271-files.gitbook.io/~/files/v0/b/gitbook-x-prod.appspot.com/o/spaces%2FR9yUYsBi0Y1eeEpTEqSa%2Fuploads%2FHmT8WDWClcrYtHW0Qsww%2Fimage.png?alt=media&amp;token=a9d7eb1e-f7ed-45e7-988e-d535dc9cf506" alt=""><figcaption></figcaption></figure>

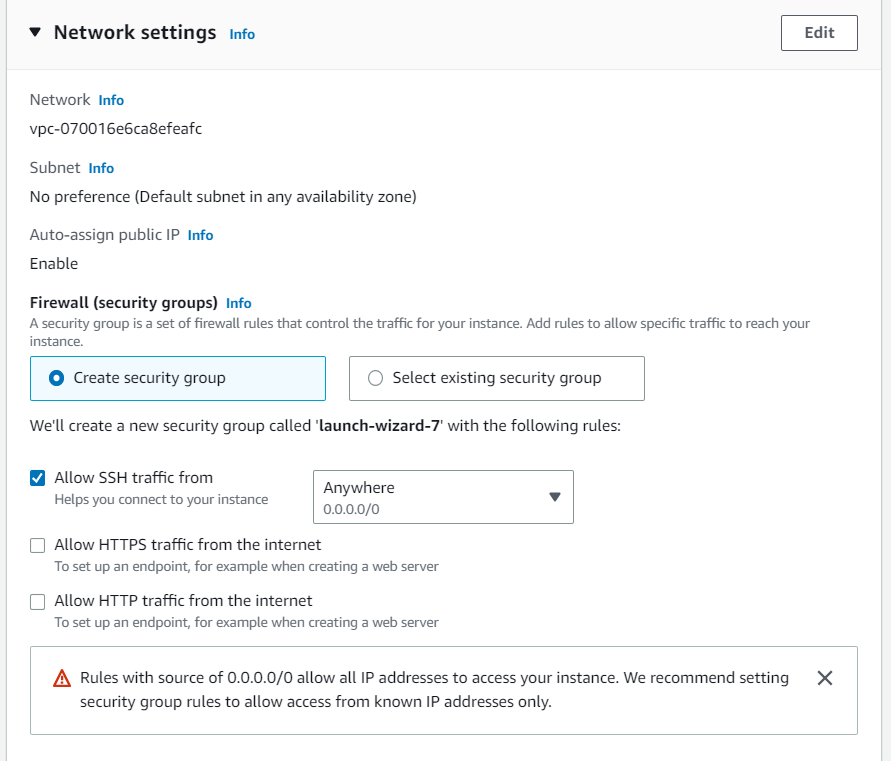
7. Choose the appropriate setting of security group according to the project requirement. In this project we are going to use normal workflow.

<figure><img src="https://389859271-files.gitbook.io/~/files/v0/b/gitbook-x-prod.appspot.com/o/spaces%2FR9yUYsBi0Y1eeEpTEqSa%2Fuploads%2FdVkHczMH1leS1at8Lft2%2Fimage.png?alt=media&amp;token=af74dd1c-3089-421e-9e60-d0ba2f290a82" alt=""><figcaption></figcaption></figure>

8. Choose the appropriate size of the volume needed in the server. Here we have a standard default requirement. Finally click on **Launch instance**.

<figure><img src="https://389859271-files.gitbook.io/~/files/v0/b/gitbook-x-prod.appspot.com/o/spaces%2FR9yUYsBi0Y1eeEpTEqSa%2Fuploads%2FH4CALJOW0NtTcrFKF12E%2Fimage.png?alt=media&amp;token=b6ba014a-5fd2-49d7-b4aa-92593a796451" alt=""><figcaption></figcaption></figure>

9. Now the instance is running.

<figure><img src="https://389859271-files.gitbook.io/~/files/v0/b/gitbook-x-prod.appspot.com/o/spaces%2FR9yUYsBi0Y1eeEpTEqSa%2Fuploads%2FquehVjCudedHvc7f89yu%2Fimage.png?alt=media&amp;token=a7a2bc67-9ee0-48e4-8a1e-5fcc9646b352" alt=""><figcaption></figcaption></figure>

10. You can access the instance through AWS EC2 Connect which is the most common way.

<figure><img src="https://389859271-files.gitbook.io/~/files/v0/b/gitbook-x-prod.appspot.com/o/spaces%2FR9yUYsBi0Y1eeEpTEqSa%2Fuploads%2F7MeyGdounvJoG9aYXRgh%2Fimage.png?alt=media&amp;token=9e06612e-3ec6-4547-829c-c1783c917f8e" alt=""><figcaption></figcaption></figure>

<figure><img src="https://389859271-files.gitbook.io/~/files/v0/b/gitbook-x-prod.appspot.com/o/spaces%2FR9yUYsBi0Y1eeEpTEqSa%2Fuploads%2FTNs37anxmLd2z3ussaAA%2Fimage.png?alt=media&amp;token=f501db2a-c135-4baa-abff-a97776d44769" alt=""><figcaption></figcaption></figure>

Now, Let's step forward to build our project.